What if we told you there was an easy way to speed up your website and protect it from some of the most common types of cyberattacks? Would you read beyond this second sentence? We suspect you would and we congratulate you on your enterprising nature. Best of all, it’s free! All you need to do is set up Cloudflare on your domain. We’ll show you how.
What is Cloudflare?
Cloudflare is a content delivery network (CDN), a global network of servers that act as an intermediary between your website and your visitors. They serve two main purposes.
First, they cache all of your website’s static elements (items that don’t change like images and videos) in each of their 32 data centers around the planet. Let’s say your website is hosted in Texas and someone visits from the UK. Instead of having to pull your static elements halfway across the globe, they’ll get them from the Cloudflare servers closest to them, speeding up your site’s load time (up to twice as fast).
Simultaneously, Cloudflare analyzes the traffic coming to your site, looking for malicious intent. It can prevent common threats like DDoS attacks, keeping your website available and unpenalized by the sudden spike in traffic.
How to Set Up Cloudflare on Your Domain in 6 Easy Steps
Before you begin, you’ll need to create a Cloudflare account. Go to www.cloudflare.com and choose “Sign Up”. You’ll enter your email address and choose a password.
Step 1: Enter Your Domain
Once you’ve logged into your new account you’ll be prompted to enter your domain. Your domain is your web address without the “www”. In our example, pugetexample.com is our domain.

Step 2: Choose Your Plan
Cloudflare has paid plans but in our experience, the free plan is more than adequate for most individuals and small businesses. Very rarely do we ever need to upgrade our clients to a paid account.

Step 3: Verify Your DNS Records
Once you choose your plan, Cloudflare will scan your domain for DNS records. In most cases, it will find what it needs, but you should still confirm their accuracy if you can. Unfortunately, we can’t predict the DNS information Cloudflare will find. As you set up Cloudflare, if you need help with this step it’s wise to contact your web host and email provider.

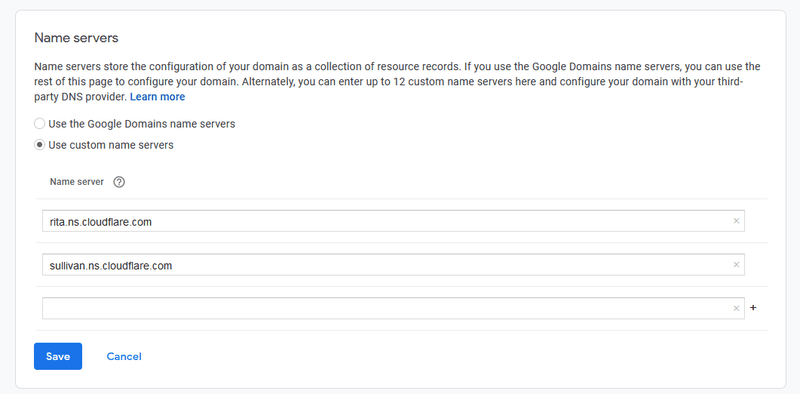
Step 4: Transfer the Nameservers Cloudflare Provides You to Your Registrar Account
After you hit “Continue” in the last step Cloudflare will display a few nameservers that you’ll need to replace the defaults currently set in your registrar account. You’ll see the nameservers you need to remove as well as those you need to replace them with.

Log into your account with the registrar that you purchased your domain from. This is often the same as your hosting account, but it isn’t always. As an example, you may have purchased your domain from Google Domains but set up your hosting with KnownHost.
In our example, we purchased our domain from Google Domains. Other common registrars include GoDaddy, Namecheap, and Domain.com. If you purchased your domain from any of these you can click their names to get instructions on how to alter your nameservers as you set up Cloudflare. But it’s generally fairly simple.
With Google Domains, all you need to do is log into your account and then choose “DNS” from the menu on the left.

You’ll be presented with your current nameservers. You’ll notice that they match the three Cloudflare told you to delete earlier. Click “Edit” at the bottom. This will allow you to alter the records.

Delete the existing nameservers and replace them with the nameservers Cloudflare provided you. When you’re finished, click “Save”.
Your changes will be saved, but it can take up to 72 hours for them to fully propagate, so be sure to leave your old and new DNS hosting online. You won’t have to worry about any downtime, however. As long as the DNS records are the same on both the transition will be seamless.
Step 5: Choose Security and Speed Configuration Options
In most cases, you can use the default settings. If you’d like more information on any of them, click the “Help” link at the bottom right of each. For now, you can click “Done” or choose to “Set Up Later”

Step 6: Enjoy the Benefits of Cloudflare!
Once the nameserver changes have fully propagated you’ll get an email telling you you’re good to go.

Congratulation! You’ve set up Cloudflare on your domain. Your visitors will enjoy faster access and you’ll be protected against malicious DDoS attacks. If you have any further questions about Cloudflare, feel free to give us a call at Puget Tech.